Showing posts with label Art. Show all posts

Monday, April 4, 2011

San Francisco MOMA

Taking a 3 year old to MOMA wasn't high on my to do list. However, we've been doing a group art class with 5 other kids and it was so fun. What better way to supplement our activities then by going to see some of the real things! Plus I'd be going as a group, so that would work.  Then to find out Rick had to be out of town and Little Sweetie would join us.

The idea of bringing a 1.5 year old (who wants to walk everywhere, touch everything and climb constantly) to MOMA, while also trying to interact with my 3 year old (and keep him from touching) was just below getting a tooth pulled without pain meds. HA!  Still I put on a positive outlook and hoped we'd last an hour!  I set my expectations really low and decided to go for it!

The day was a huge success! Turbo really enjoyed the museum. They have a small kids area and on scheduled days have Art related crafts for them.  Today we made Zeotropes.


The kids were able to make Mondrian inspired art on the computer. He was the first artist we studied 7 weeks ago and the kids all still remembered his name and his art!

Little Sweetie played with the blocks, climbed on the chairs and read the books

We went on the Family Tour. It was a tough time for Little Sweetie since she wanted to be walking. There is art and platforms everywhere and just too tempting for little fingers. So Little Sweetie was mostly held.  The Docent was terrific! She just took Turbo up with her and went about the tour.  I was so proud of him that he really listened to the directions and didn't touch the art at all.
The tour was on the museum sculpture. 
Turbo enjoyed creating his own puzzle piece sculpture.

INSPIRATION
Finished Sculpture!
Lots of outdoor sculptures (Although I didn't get many pictures due to a squirmy girl!)

After the tour we walked around a bit more. Turbo was intrigued why chairs, equipment and such were art. We talked about grouping with an artful eye and artistic display of common items and how those can both create art.  

Then we went to the cafe for a snack. Doesn't this Mondrian cake look amazing! Even the kids were impressed!

We were there for OVER THREE (3) HOURS! Can you believe it!  We were on our way to the elevators and Turbo declares he would like to see even more.  Nothing a promise of a Pocky Stick in the car couldn't change.  Here's all of us at the end of our long and wonderful day.

Monday, March 14, 2011

Art Class - Georgia O'Keeffe

Art Class Week 3 was Georgia O'Keeffe.  While she is most famous for her flowers, the Mommy teacher this week taught us she really a Nature Painter. She painted all sorts of images from nature and would take something small, like a pebble, and use that one image as the entire focal point for her art - making the pebble fill the canvas and become larger than life.

Black Rock and Blue sky
From the Lake I
The teacher had the kids do two projects - both creating something from nature.

Project 1 - Oil Pastels - Free draw something from nature - Turbo titled his piece "Multi-Colored". He said that nature had many colors and so he drew "Multi-Colored"

Project 2 - Watercolors - Free paint something from nature. I think Turbo was just painting at random for this art, because when asked he said he didn't know.  Being the (bad!) helpful mom, I suggested it look like a Lake (I try to NEVER do this! ugh!). Of course he said "Yes, that's it, it's a black, purple and greenish Lake"

We're also going to do a few other O'Keeffe art projects since I have really grown to like her work - specifically the flower paintings.  

Friday, March 11, 2011

Art Class - Paul Klee

For our Second Weekly Art class, Turbo and I were both very sick, so I was unable to teach my lesson plan BOO! Thankfully the coordinator, Rachel, filled in and both hosted and taught my plan (THANKS!).   Turbo and I still worked in the art activities into our day. It was a nice break from sleeping and watching movies!

I created a laminated page of Klee art for the kids to reference during and after class. We talked about how Paul Klee paints in a simple, child-like way with Bright Colors, Geometric Shapes, Faces, Animals and sometimes funny aspects to his work. Turbo looked at the art and told me what he saw, what he liked and what he found funny.  He liked the faces, especially the cat face. He saw lots of colors and animals.  He thought it was funny the cat face had a bird in it and that the bird picture had one upside-down.  I loved that he really looked at the art and evaluated it.  I also noticed he paid little attention to the art work without faces, animals and such.

Project 1 - Crayon Relief - Color with brightly colored crayons then wash over the drawing with black watercolors.

Project 2 - Stencil Shapes - I printed a page with various shapes, laminated it and cut them out with an exact-o knife.  We had both Positive Image and Negative Image stencils.  This was Turbo's first time with stencils of any kind. Using a scrap paper, I used a square stencil to demonstrate the technique for Turbo.  Then I placed the square on his paper for him to try. That was the extent of my 'help'. After doing the square, he noticed the triangle and immediately thought of houses and decided to make this art! He did the entire project on his own - 3 houses with chimneys and smoke and 1 sun.  I will be framing this for sure!

Project 3 - Texture - Paul Klee painted with various mediums and would often add texture aspects to his work.  We mixed 2 parts basic shaving cream to 1 part white glue and added some paint for color.  Turbo gooped it onto his paper, spread it around, mixed the colors and used forks, sticks and other items to add texture to his art. It dries puffy, so the final piece has some texture also. Very cool!

Monday, March 7, 2011

Art Class - Piet Mondrian

A few weeks ago we started an art class. I'm so grateful to the Mom with the idea and who coordinated schedules to get 6 kids (4 Moms) together once a week.  Our group is 3 & 4 year olds, so we decided to focus on a different artist each week. We start with a circle time (song, discussion of the art/artist, and activity or story), then the kids do 3 projects in the style of that artist. Each Mom will teach twice and we'll do a field trip at the end. 

We've been having a terrific time!  I know little about famous artists, I'm not very 'artsy' and it had been awhile since we'd done art - much less done it regularly.  Our class has really been an inspiration for both of us.  Turbo has been asking to do some kind of art every day since the start of class. It's awesome to hear him create something and say - this is like Paul Klee, Mondrian or O'Keeffe.  I've been learning about various artist and expanding the tools and mediums we use to create art!

Easy, Fun and Inspirational.  Here's a sample of Piet Mondrian's art. 

Project 1: Glue bright colored geometric shapes and black lines onto paper

Project 2:  Chalk on Black Cardstock - the kids put masking tape in various locations on black cardstock. Then colored with Chalk. Removing the tape, left uncolored black space between the colored areas.

Project 3: Paint on White Paper - similar to above, the kids placed masking tape in random locations on Paint Paper. Then painted with various colors. Removing the tape left crisp white lines between the painted areas.
 

Saturday, March 27, 2010

Collage Art

Shannon over at Welcome to our Wonderland is hosting a weekly link up for Collage Boxes.  If you remember all our Open Ended Art projects were inspired by her themes and link-ups.  I've seriously been needing to get back into a Weekly Art link up because I'm not the crafty, creative type. So I'm excited that she's hosting the weekly Collage Boxes.

In the late Summer last year we did a Contact Paper collage. I taped Contact Paper to the wall (sticky side out) and gave him some tissue paper, google eyes, pompoms, and construction paper.  I thought for sure I had blogged about it, but can't seem to find the post  *snif*.  At a little over 2 years old, he was very interested in the texture of the items, the stickiness of the paper and the defiance of gravity when he put the items on the paper. He was very intent on filling up every inch of the contact paper with all the pieces. There wasn't really a pattern or order to the placement.

I decided to see what he'd create 8 months or so later, given similar materials.

Here's his art at the end of Day 1.

Day 2 -  he took down all the google eyes (he loved that part) and this is what he created. You can see there's a definite pattern to his use and placement of materials today.  He did a lot of sets of 3s.
Also, he talked about the pieces as he placed them "long, orange rectangle; green circle, red pompom etc."  I glad about that because when I tried to work on long, longest, short, shortest with him earlier in the week, I was convinced he'd forgotten it all as he was not at all interested.  Sort of like my story about money, here Much to my joy, he was listening even if not interested. (Hope his teenage years are like that!)

Day 3 - Today he added hearts and squares. He seems to be keeping the shapes and items organized on his paper. I wish I could find the picture from months ago so you could also see the change.

Day 4+ - He lost interest in it towards the end of the week. That's ok. He really enjoyed it the first few days and I know he will enjoy doing this concept again next week.
I think I will do this more often - bring out old projects/materials to use again in a similar way.  It's fun to see how his thinking has changed and how he brings in concepts we've learned to art!

Monday, November 30, 2009

Hans Hoffman Inspired Art

Hans Hoffman is the inspiration for this week at Open Ended Art.  I created a collage of Hoffman's work and posted it on the wall in Turbo's playroom.  We also looked at Hoffman art on the computer. Turbo looked at 10 or more pieces (a new record) and really enjoyed identifying colors and shapes on the art. His favorites were Autumn Gold and Landscape.

The supplies were paper, cut rectangles of various colors and sizes and a new painting tool - the roller.  Oh my, he was in heaven!!  He had so much fun painting with that roller!
He painted....


and painted...


and painted.


MUCH to my surprise he got his hands in the paint. It started with squishing the roller then proceeded to full finger painting!! 


This is hysterical because he does not like paint on his hands (at all!!) and I've been wanting to make handprint painted turkeys all month. He absolutely would not do it - even when Daddy and I both did. Now that he's broken the ice, I'm hopefull he'll do it again!

Wednesday, November 4, 2009

Inspired by Henri Matisse

This week's Open Ended Art theme is the artist Henri Matisse.  After reviewing his art, I chose to do something like Le Gerbe.  I bought a leaf punch and we set to work.


The punch required a bit of arm muscle, so I held the paper while Turbo used two hands on the punch. When he first started, he couldn't get the punch without a little help from me. Then he figured out the leverage and pressure and was able to do it by himself with just stabilization help.  He absolutely loved punching the paper!


He's never used a glue stick before.  I'm not sure he realized it was glue - he likely thought it was a fat purple crayon!  


Then the experience went a bit south. It was completely my doing.  My sweet Turbo was experimenting with his materials (as we always do), fiddling with the punch and crumpling his leaves with happiness. Me, I sat and got frustrated ("don't do that" was heard more than once).  I tried to encourage him (ok, told him in a frustrated voice) to place his leaves...  It was everything I could do to keep my paws off his art. This is the first time I've felt this way about our projects.  Probably because it's the first time I've really had an expectation of the outcome. Plus, I really liked my idea - found a great art, bought a new tool....so I'm sure there was a bit of ego investment.


He did a terrific job, but it wasn't the art he wanted to create. I was a bit too involved and invested on this one.  Of course I'll have a lot more chances to practice and improve. Good learning experience for the Mommy today.


Go visit Mommies Wise Little Bookworms to see some other Matisse inspired art!  Then join in!

Saturday, October 31, 2009

Pumpkin Painting

Another fun Open Ended Art project. This week was Pumpkins. Yep, anything goes as long as it's related to pumpkins.  We had a couple small pumpkins from our visit to the patch.  We decided to paint one! Turbo loved the idea and worked with great focus and interest in the project.


I realized up until now, we've done all of our painting on objects made for painting - paper, craft items etc. I can't remember having him paint something not made for paint.  Open Ended Art has helped me think outside the box with our art. Go visit Mommies Wise Little Bookworms and get inspired too!

Friday, October 30, 2009

Art Journal & Free Photo Book

As I was looking through Turbo's older art, I realized again just how much his drawings and paintings have changed. The first pictures were clumsy swipes and dots - (ok, he was really just banging the crayon...but they were still dots.)  I smile remembering those first drawings and how often more crayon in his mouth than on the paper!

I want to document the ongoing progression of his art in a way that's easy to look back on it. I have two great ideas!


#1 - Art Journal. What a great way to have a single source of his drawings in a way that is easily stored, reviewed and preserved!  It will be so fun to turn the pages and see his art evolve and take shape into pictures of his life, experiences and thoughts.


Using a Michaels craft store 40% coupon, I purchased a hard-bound book with blank pages. You can also find these at many book stores. Each month he'll draw in the book. I'll date it and eventually ask him to write his name on the paper. What a great way to see his signature evolve too!  We started today.


#2 - Photo Book - I'll take pictures of his arts and crafts through out the year and then put them in a photo book.  It's a great way to preserve but not keep all of his work.  My favorite place to make books is Shutterfly. They have the best templates, are super user friendly and have great quality.  Use this Shutterfly link to get your free Photo Book. If you go there directly, the promo code is: UR48-4V38-GZB3-4Z1A7. The offer expires 11/30/09, so get over there soon. It's FREE - think Christmas gift, birthday gift or keep it!  You could make a timeline book - say highlights of 2008 or 2009. You can also make a theme book - say the last 6 years of family Thanksgivings (easter, summer vacations, birthdays, crafts, nature activities - whatever!)


shutterfly.com picture


Have any other ideas? What are you doing to keep your child(ren)'s art?

Monday, October 26, 2009

Black and White Art

This is my favorite recent drawing of Turbo's. It shows or represents growth in many ways.


He spent almost 10 minutes coloring this paper - both sides!! His attention span for coloring has grown soooo much.

He was holding the crayon in the correct position - without any coaching from me. He's fine motor and pre-writing skills are growing.

He was telling me about his art as he was drawing. He drew long tales, smily faces, circles and even made some writing letters. 


He's intentionally using different shapes while drawing. He's drawing with straight, wavy, and circular lines.  He knows this and talks about the type of line he's drawing.

He intentionally wanted to cover a lot of the paper.  Most of his previous drawings have been a couple of scribbles on one area of the paper. He's using different techniques and noticing porpotion more.


Unfortunately I missed the cut off to join this week's Mr. Linkey, but I still wanted to post about it!  To see what others are doing, head over to Mommies Wise Little Bookworms

Wednesday, October 14, 2009

Orange & Black Art - spin baby spin

We love the themes Mommies Wise Little Bookworm suggests for Open Ended Art and have been participating every week.

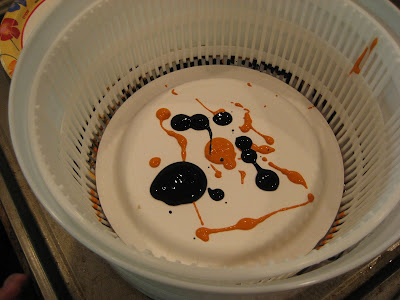
This week was Orange and Black. Turbo loves the salad spinner. It's on a shelf where he can reach since he plays with it often. Last week Mommies Wise Little Bookworm used a salad spinner to make their art. As soon as I saw it - I knew Turbo would be thrilled. Understatement! He had such a great time.

I love the way these turned out. We're going to start adding his art to a wall in his room. I haven't put anything up on this wall yet and these are perfect!!

Anyone have a cute idea on how to hang them??

Put a plate in the spinner, squeeze paint


Inspect


Spin! - his favorite part! He took great joy in spinning as fast as possible and peeking in the top holes to see the colors SWIRL!


He asked for more colors so we pulled out red and blue also. We'll be using this technique a lot! I think you can teach layering, color blending and more through this. Who knew a salad spinner is a teaching toy?!?


I love them! Next time, I'll consider cutting some construction paper to fit the spinner. It will be nice to have a background color on some of them. I will absolutely have Turbo use an eye-dropper to place the paint. It will give him a lot more control over paint location and will help reduce waste a bit.